HTML Forms
-
This lesson explains how to create and use HTML forms to collect user input using form tags, input fields, labels, and buttons.
Why Forms Are the Heart of the Web
Imagine the web without forms - No login, no signup, no search box, no shopping cart, no payments… nothing interactive.
Forms make websites come alive. They enable:
Authentication (login / signup)
Every dynamic web application depends on forms.
Search & filters (YouTube search, Amazon filters)
Add to cart + checkout (shopping websites)
Online payments (UPI, card, wallets)
Communication (contact forms, feedback)
Forms are the bridge between users → browsers → servers.

What Actually Happens When You Submit a Form ?
When a user hits the Submit button:
Browser scans the <form>
It collects all inputs inside the form.
Each input sends data as a key–value pair
Example:
name = value
email = alex@gmail.com
password = 123456
Data is structured according to the method
If GET, data goes in URL
If POST, data goes in HTTP body
Browser sends a request to the URL in action
Example:
/login, /signup, /search, /checkoutServer receives the data
It checks:
Is the email valid ?
Is the password correct ?
Is the payment secure ?
Server responds back:
Login success
Wrong password
Missing fields
Payment completed
👉 Your form is the connection between frontend & backend.
Without forms, users cannot interact with data.Imagine you are logging into Instagram
You type:
Username
→ Hit Login
Login Form
This form collects the user’s username and password for authentication. It securely submits the login details to the server using the POST method.
<form action="/login" method="POST">
    <label for="user">Username</label>
    <input type="text" id="user" name="username" required>
    <label for="pass">Password</label>
    <input type="password" id="pass" name="password" minlength="8">
    <button type="submit">Login</button>
</form>
Behind the scenes:
Input Key Sent to Server Value Username username your typed username Password password your password
Server checks:
Is user registered ?
Does the password match ?
Is the account secure ?
Then shows:
Login success → Take user to dashboard
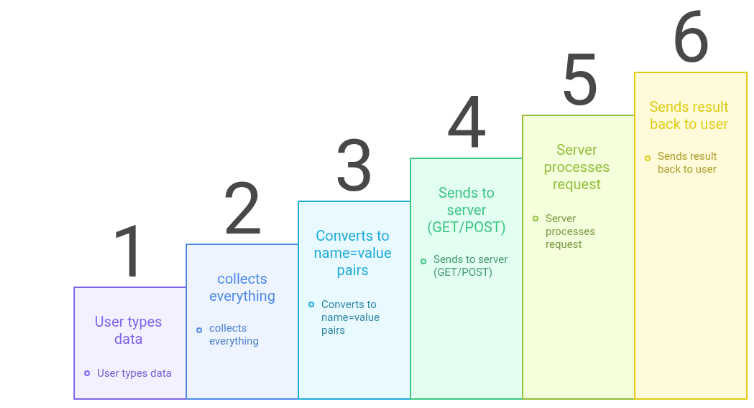
Login failed → Show error messageHow a Form Works
User types data
↓
<form> collects everything
↓
Converts to name=value pairs
↓
Sends to server (GET/POST)
↓
Server processes request
↓
Sends result back to user
Analogy
Think of a pizza order form :
You choose size → input
You choose toppings → checkbox
You write address → textarea
You click Order → submit button
Then:
Order goes to kitchen → server
Pizza gets prepared → processing
Delivered to your home → response
Full Form Anatomy
Below is a complete login form. This is the heart of every web application:
User Login Form
This form allows users to enter their username and password to log in. The data is securely sent to the server using the POST method for authentication.
<form action="/login" method="POST">
  <label for="user">Username</label>
  <input type="text" id="user" name="username" required>
  <label for="pass">Password</label>
  <input type="password" id="pass" name="password" minlength="8">
  <button type="submit">Login</button>
</form>
Understanding the <form> Tag
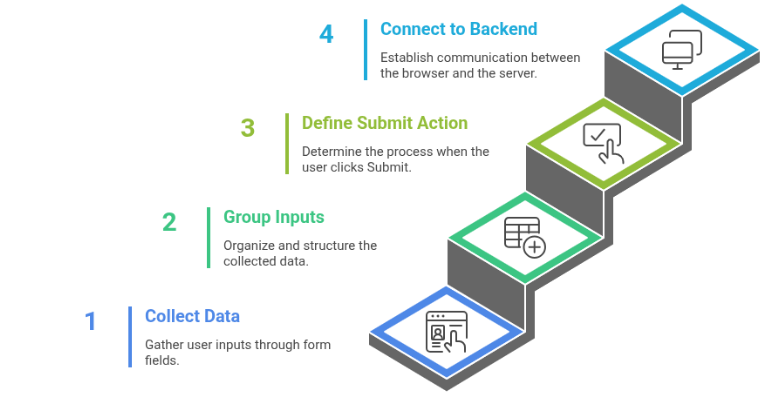
Role of a Form
A form is like a container that holds all user inputs.
✔ Collects data
✔ Groups inputs together
✔ Defines what happens when user clicks Submit
✔ Connects the browser to the backendYou can imagine it like a delivery box
Inputs = items inside box
Submit button = sends box
action = where box is delivered
method = how delivery is done
Important Form Attributes
Attribute Meaning action Where data is sent (URL) method How data is sent (GET/POST) target Opens response in new tab or same tab autocomplete Enables/Disables autofill novalidate Turns off browser validation
method="GET"
<form method="GET">
How GET Works
Data is added in URL as a query string
Example: /search?q=html&page=1
Best For:
✔ Search
✔ Filters
✔ Bookmarkable pagesProblems:
Data is visible
Limited length
Not securemethod="GET"
<form method="GET">
How POST Works
Sends data in the request body
Hidden from URL
No size limits
Best For:
Login / Signup
Passwords
Payments
File uploadsAlways use POST when sending sensitive data.
- <label>
Email Input Field with Label
This code creates an email input field with a label, allowing users to enter their email address in a clear and accessible way.
<form>
    <label for="email">Email</label>
    <input id="email" type="email">
</form>
Why <label> is Important
Clicking the label focuses the input
Helps blind users (screen readers)
Required for proper accessibilityBad
<label>Email</label><input>
Good
<label for="e">Email</label>
Form with Text Input
This code shows a simple HTML form containing a text input field, used to collect basic user input.
<form>
    <input type="text">
</form>
Inputs can collect:
names
emails
passwords
numbers
dates
files
colors
ranges
Buttons
Common Input Types Explained
text
Single-line input
Example: Username, Full Nameemail
<input type="email">
Validates email format
Shows correct keyboard on mobilepassword
Hides characters
Does NOT encrypt — needs HTTPSnumber
<input type="number">
Only allows numbers
Adds up/down arrowsdate
<input type="date">
Shows calendar picker
file
<input type="file">
Used for uploading:
images
pdf
videos
Must include:
enctype="multipart/form-data"
Input Attributes
Attribute Meaning name Key used by server value Default value placeholder Hint inside input required Must be filled readonly Cannot edit but visible disabled Can't edit & not submitted pattern Regex validation min / max Range control If there is NO name, the data is NOT sent to the server.
<textarea> (For Long Messages)
Textarea Input Field in HTML Form
This code creates a textarea inside a form, allowing users to enter multi-line text such as comments or messages.
<form>
    <textarea rows="4" cols="40"> </textarea>
</form>
Best for:
feedback
reviews
comments
messages
Supports:
maxlength
readonly
required
<select> Dropdown - Smart Input
Dropdown Menu Using Select Tag
This code creates a dropdown list inside a form that allows users to choose a course such as HTML or CSS.
<form>
    <select name="course">
        <option value="html">HTML</option>
        <option value="css">CSS</option>
    </select>
</form>
Only one value is sent
selected makes it defaultRadio Buttons - Choose Only One
Radio Button Group Example
This form uses radio buttons to let users select one option Male or Female from a single choice group.
<form>
    <input type="radio" name="gender" value="m"> Male
    <input type="radio" name="gender" value="f"> Female
</form>
Same name = only one can be selected
Checkboxes - Choose Many
Checkbox Input Field in HTML Form
This code shows a checkbox inside an HTML form, commonly used to accept terms and conditions, with the checkbox pre-selected by default.
<form>
    <input type="checkbox" name="terms" checked>
</form>
Can check multiple
Each sends its valueSubmit Buttons
Submit Button in HTML Form
This code creates a submit button inside a form, which sends the form data when clicked.
<form>
    <button type="submit">Send</button>
</form>
Triggers form submission.
Multiple buttons = different actions.
Multiple Form Actions Using Buttons
This example shows how different buttons in a form can submit data to different URLs using the formaction attribute.
<form>
    <button formaction="/save">Save</button>
    <button formaction="/publish">Publish</button>
</form>
HTML5 Validation
Browser provides built-in validation:
required
pattern
minlength
type="email"
Not enough for security
Server must validate againAccessibility & UX
Always use:
✔ <label>
✔ Descriptive placeholders
✔ Helpful error messagesScreen readers rely on:
✔ Labels
✔ aria-* attributesCritical Security Warnings
NEVER:
Trust form data
Store raw passwords
Use GET for login
Skip HTTPSALWAYS:
Validate on server
Hash passwords
Use HTTPSForms are the center of all interactive websites.
✔ Collect data
They:
✔ Validate it
✔ Send it to server
✔ Power login, signup, search, payments, uploads